Fine-tuning a LLM on my blog posts
Ever wondered what it would be like to have an AI that writes exactly in your style? I did. And in this post, I share what I did about it. This is a very practical guide on how to fine-tune an LLM using LoRA with MLX on Apple Silicon.
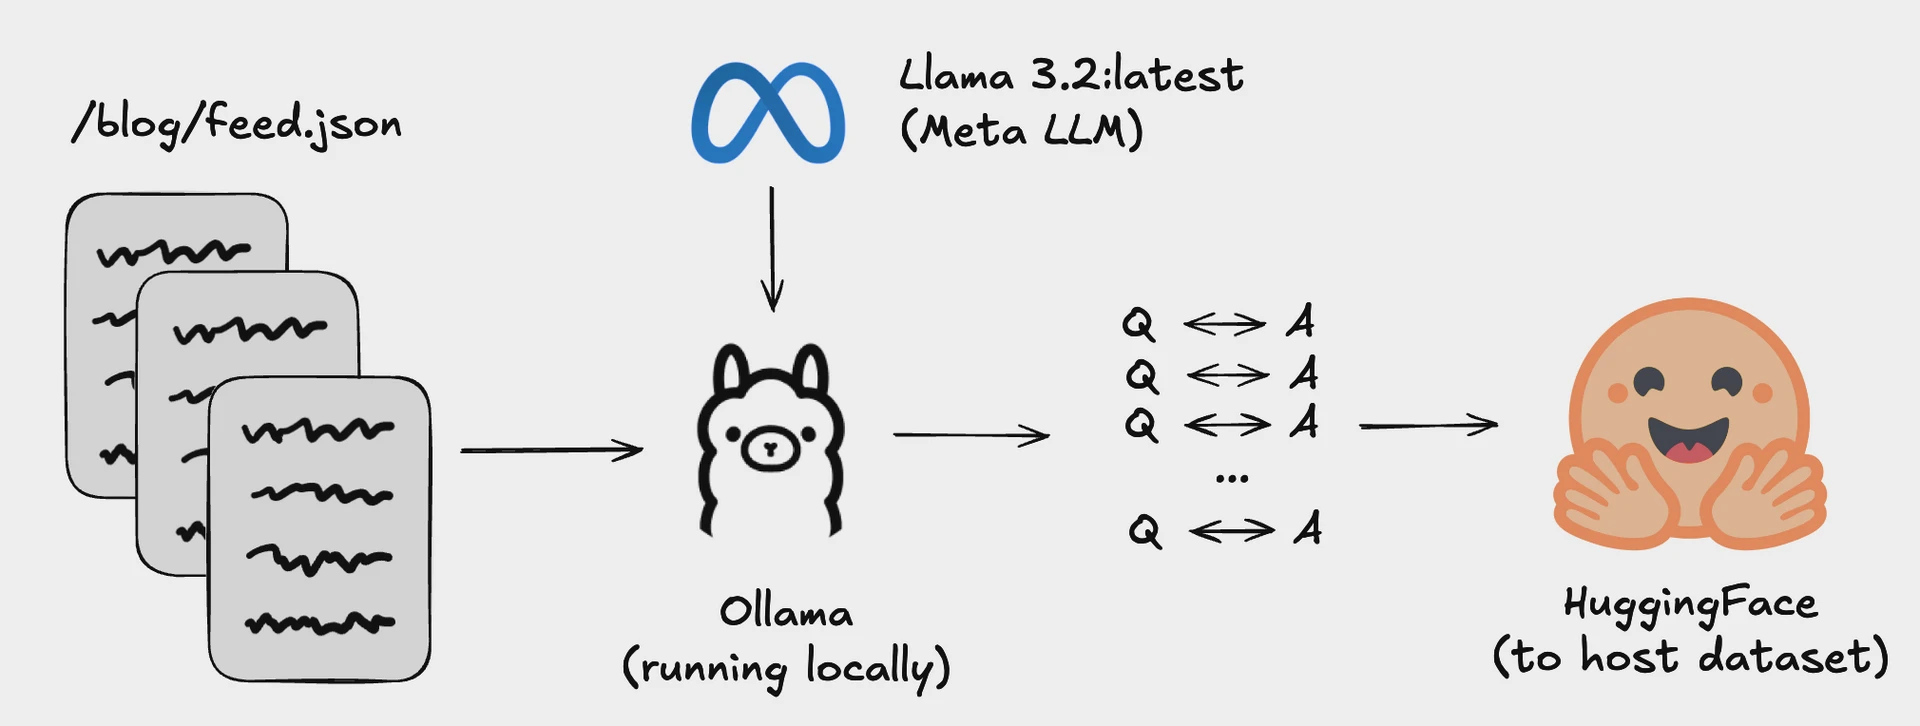
At the start of the year I shared this blogpost, which converted all my blogs into a Q&A dataset that I could use to fine-tune a LLM.
After sharing this, I spent time trying to fine-tune an LLM - but results were not great and combined with all things happening at OpenBB I didn't have time to dedicate a lot of time to this. :upside-down-hf-logo
But I hate leaving things half way. And this task didn’t leave my TODO for the past 6 months.
So I finally took things to my hands last weekend, and I’m going to share the entire journey on what, why and how.
Buckle up, this will be a long post - and more technical than previous ones. And all the code will be available here: https://github.com/DidierRLopes/fine-tune-llm.
Context
Most AI models are like Wikipedia - they know a little about everything but lack the depth and personality that comes from lived experience.
Think of it this way: RAG is like giving someone a reference book during an exam. Fine-tuning is like actually teaching them the subject until it becomes part of how they think.
“Once you’ve maximized the performance gains from prompting, you might wonder whether to do RAG or finetuning next. The answer depends on whether your model’s failures are information-based or behavior-based.
If the model fails because it lacks information, a RAG syustem that gives the model access to the relevant sources of information can help. (…) On the other hand, if the model has behavioral issues, finetuning might help.”
- Chip Huyen’s - AI Engineering (Chapter 7: Finetuning)
When you fine-tune a model on your writing, you're not just feeding it information (particularly with small models and a LoRA - you're rewiring how it processes and responds to ideas. The same neural pathways that learned to write about quantum physics now learn your specific way of sharing thoughts on open source, MCP, boxing, and others.
In this case, because we will fine-tune an instruct model - even the system prompt becomes part of this personalization process from the very first token. It’s not a simple “You are a helpful assistant" but “You are Didier, CEO of OpenBB. You write with clarity and impact, focusing on fintech, open source, AI, and the future of research workflows”.
This will result in a fine-tuned model that thinks in your voice and operates with your expertise baseline. To some extent that is, we will see later that the information transfer could be better. I attribute that to the fact that we are using a small (3.8B model), we are doing partial fine-tuning (only 0.08% of weights will be updated) and I didn’t spend a lot of time iterating on the hyperparameters.
0. Setting up the foundation
Model
I chose Microsoft's Phi-3 mini model (3.8B parameters) for several strategic reasons beyond just "it fits on my Mac":
Technical sweet spot: At 3.8B parameters, Phi-3 mini hits the perfect balance - large enough to produce coherent, contextual responses, but small enough to fine-tune efficiently on consumer hardware. Larger models like 7B+ would require more aggressive quantization.
Instruct-optimized foundation: This isn't a raw base model. Phi-3 mini is already instruction-tuned with supervised fine-tuning (SFT) and likely RLHF, meaning it understands how to follow prompts and maintain conversational flow. This gives me a much better starting point than training from a base model. Note: Microsoft actually did not release the base model.
Ecosystem support:
- This code reference gave me a working starting point
- There was an official cookbook with best practices
- There was a good model card on Hugging Face with clear usage example
Hardware compatibility: With my M3 Max and 48GB RAM, this model fits comfortably in memory with room for LoRA adapters and training overhead.
Finetuning Technique
Traditional fine-tuning updates all 3.8 billion parameters, requiring enormous compute resources and risking catastrophic forgetting (where the model loses its general capabilities while learning your specific data).
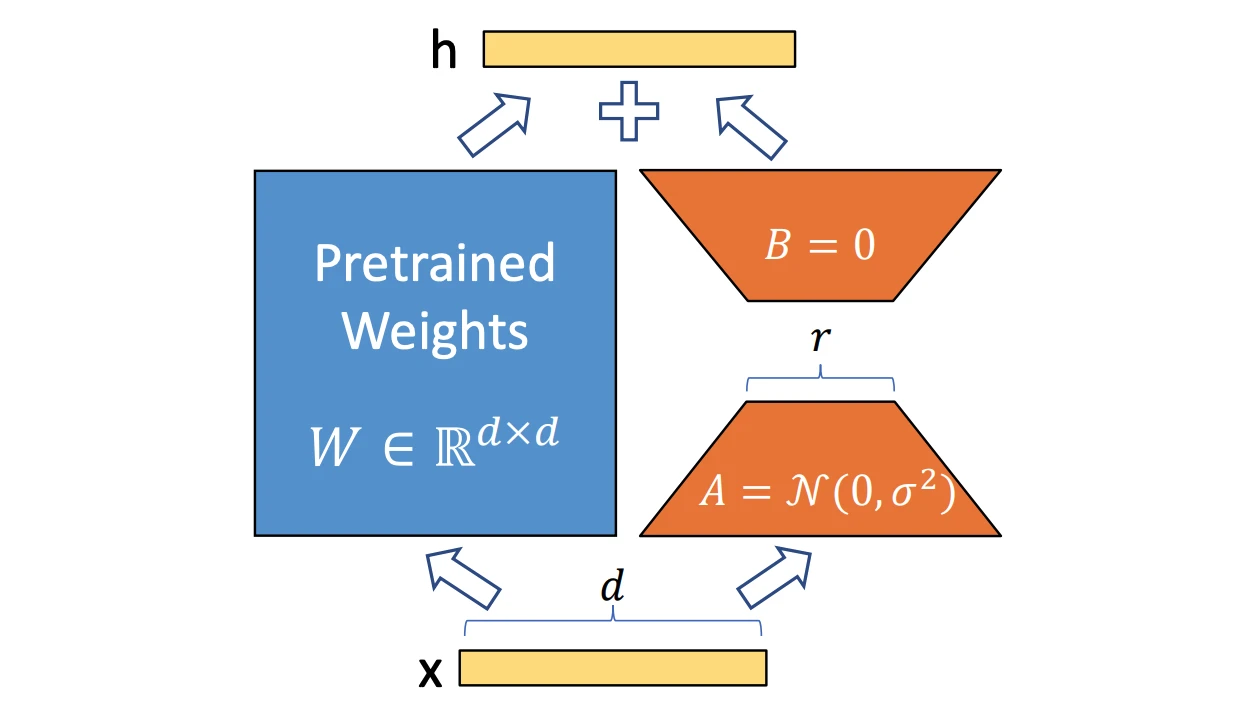
LoRA's elegant solution: Low-Rank Adaptation works by decomposing weight updates into smaller matrices. Instead of modifying a large weight matrix W directly, LoRA adds two smaller matrices A and B such that the update becomes W + BA, where B has rank r and r << d (with d being the original dimensions). More on LoRA here.

Why this matters:
- Parameter efficiency: I'm only training a small percentage (
<0.2%) of the entire 3.8b model - Memory efficiency: Base model stays frozen, only adapter weights need gradients
- Modularity: Can swap different LoRA adapters for different tasks/personalities
- Reduced overfitting: Smaller parameter space makes it harder to memorize training data (which also validates the fact that fine-tuning is not best choice to give more information to a model)
Framework
MLX is specifically designed for Apple's unified memory architecture. While PyTorch can run on Mac, it wasn't built with Apple Silicon's unique characteristics in mind.
Key MLX benefits:
- Memory efficiency: Unified memory means no CPU/GPU transfers, LoRA adapters and base model share the same memory pool efficiently
- Lazy evaluation: Only computes what's needed, when it's needed - crucial for memory-constrained fine-tuning
- Native optimization: Built for Apple's AMX (Apple Matrix Extensions) and Neural Engine integration
Most production fine-tuning still happens on NVIDIA GPUs with PyTorch. But for Apple Silicon users, MLX offers several advantages:
- Lower barrier to entry: No need for cloud GPUs or expensive NVIDIA hardware
- Rapid experimentation: Faster iteration cycles for smaller models
- Privacy: Everything runs locally, no data leaves your machine
Note that I was able to do this because I was working with a <10B parameter model and had Apple Silicon with 48GB RAM. But more importantly, this was done for experimentation, and not production - so I chose what allowed me to get my hands dirty faster.
1. Preparing the data
Code can be found here: https://github.com/DidierRLopes/fine-tune-llm/blob/main/scripts/01_prepare_data.py.
For the data we will be using a Q&A dataset based on my blogposts. The repository where I turned my blog posts into this dataset can be found here.
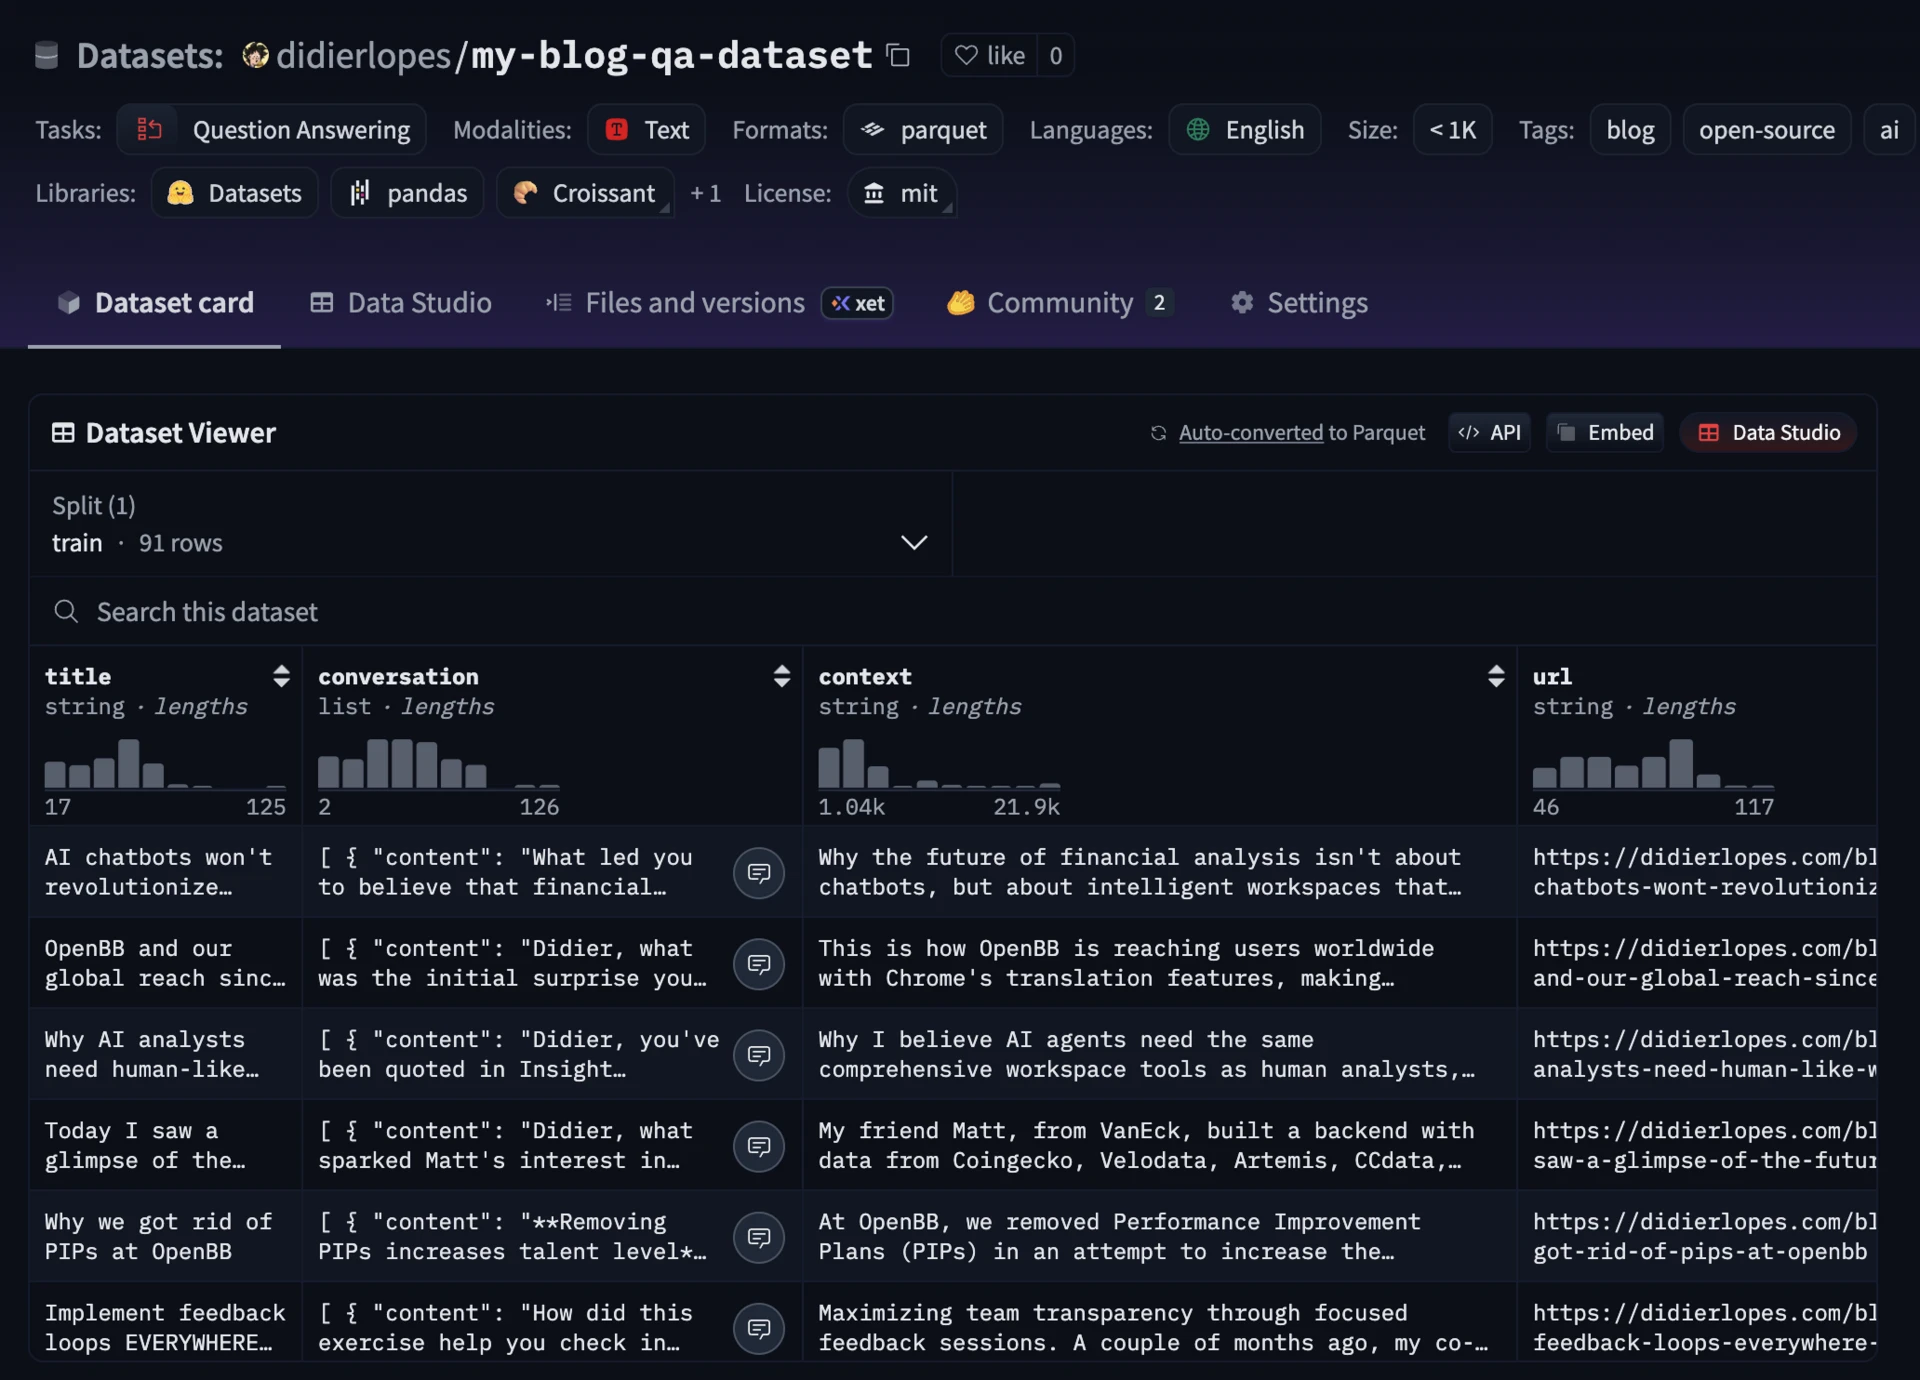
The dataset contains 91 blog posts transformed into conversational Q&A pairs - roughly 2,100 exchanges covering everything from OpenBB's journey to technical deep-dives on open source.
Each entry in the dataset contains conversations with user questions and my responses. But raw conversational data (which I parsed from a blogpost) isn't something you can just throw at a model. It needs structure, and more importantly, it needs the right structure for your chosen model.
Formatting for phi-3-mini-4k-instruct
Phi-3-mini-4k-instruct has been trained with a specific chat template, and we need to follow it - otherwise results won't be optimal (this was one of my first mistakes!)
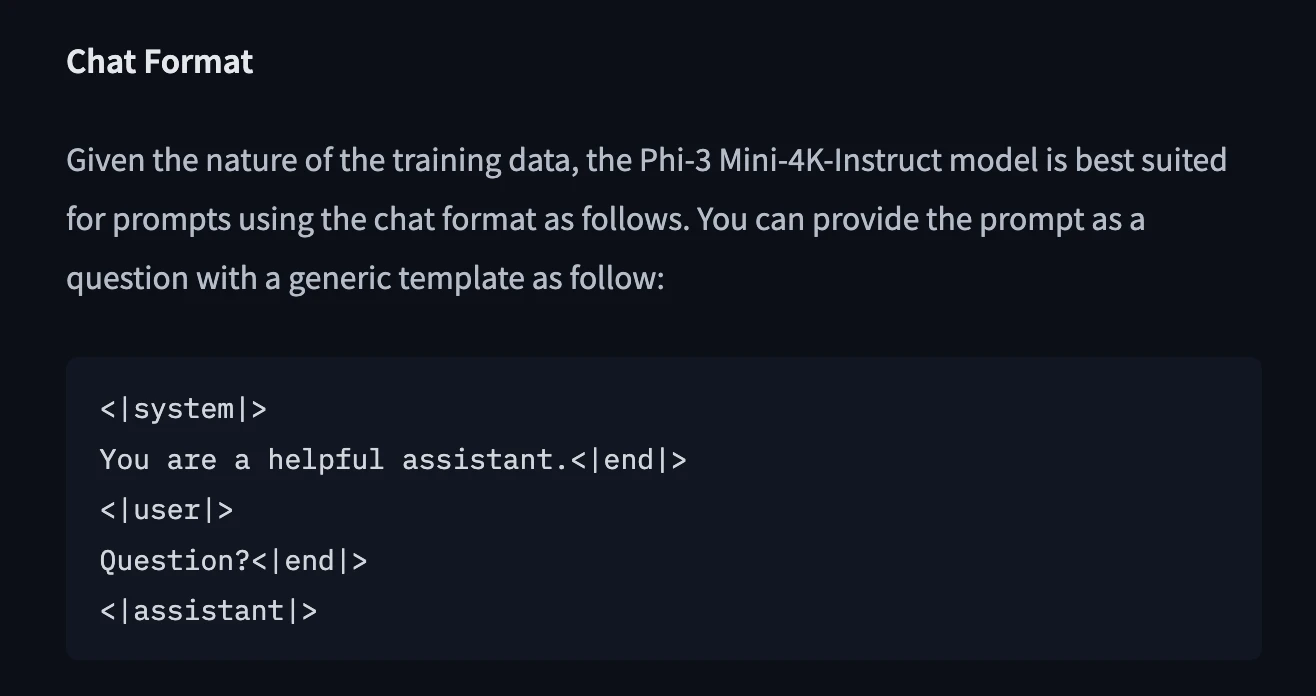
You can find that template in the model card on HF: https://huggingface.co/microsoft/Phi-3-mini-4k-instruct
Important: Since this is an instruct model, then it is important to retain the system prompt on the training samples. (I also did a mistake here!)
Example:
<|system|>
You are a helpful assistant.<|end|>
<|user|>
How to explain Internet for a medieval knight?<|end|>
<|assistant|>
Those special tokens (<|system|>, <|user|>, <|assistant|>, <|end|>) aren't decorative, they're semantic markers that tell the model exactly where each part of the conversation begins and ends. (Do not forget these, and ensure there are no typos! I did not do a mistake here ehe)
I actually added a function to validate if the required tokens existed, and are in the right order.
Training split
One of the most common mistakes in fine-tuning is treating your test data as validation data. Here's how I split the ~2,100 samples:
- Training (80%, ~1,700 samples): The model learns from these
- Validation (10%, ~210 samples): Monitors training progress in real-time.
- In typical ML systems, this is used to tweak hyper parameters. In this case it checks the validation loss during training - and allows you to avoid overfitting, by making sure that training loss doesn’t diverge from validation loss.
- Test (10%, ~210 samples): Final evaluation, never touched during training
But before splitting, I shuffle all samples from all conversations. This avoids temporal bias where training data represents one era of thinking while test data represents another.
One of the reasons for which I recommend displaying the number of samples is so that you can put yourself in the shoes of the model to understand how many samples it will see; and that will help you make better decisions in terms of the training and model configs.
Preparing data logs
$ python scripts/01_prepare_data.py --config config/data_config.yaml

============================================================
DATA PREPARATION PIPELINE
============================================================

>>> Step 1: Loading raw dataset...

Loading dataset: didierlopes/my-blog-qa-dataset
Dataset loaded successfully. Available splits: ['train']
Dataset size: 91 samples
Dataset features: {'title': Value('string'), 'conversation': List({'content': Value('string'), 'role': Value('string')}), 'context': Value('string'), 'url': Value('string'), 'date': Value('string')}

>>> Step 2: Processing and formatting data...

Starting data preprocessing...
Extracted 2129 conversation samples
Data split created:
Training samples: 1705 (80.1%)
Validation samples: 212 (10.0%)
Test samples: 212 (10.0%)
Data preprocessing completed successfully!

>>> Step 3: Validating processed data...

Validating training data...
Validating 10 samples...

📊 Validation Summary:
Total samples checked: 10
Valid samples:         10
Invalid samples:       0
Validation rate:       100.0%

✅ All samples passed validation!

Validating validation data...
Validating 10 samples...

📊 Validation Summary:
Total samples checked: 10
Valid samples:         10
Invalid samples:       0
Validation rate:       100.0%

✅ All samples passed validation!

Validating test data...
Validating 10 samples...

📊 Validation Summary:
Total samples checked: 10
Valid samples:         10
Invalid samples:       0
Validation rate:       100.0%

✅ All samples passed validation!

Sample statistics:

📈 Sample Statistics:
Total samples:     2,129
Average length:    721 characters
Min length:        340 characters
Max length:        3,880 characters
Total characters:  1,536,016

>>> Step 4: Saving processed data...

Training data saved to: data/processed/train.json
Validation data saved to: data/processed/val.json
Test data saved to: data/processed/test.json
Data statistics saved to: data/processed/data_stats.json

Training data: data/processed/train.json
Validation data: data/processed/val.json
Test data: data/processed/test.json
Statistics: data/processed/data_stats.json
Training samples: 1705
Validation samples: 212
Test samples: 212
2. Train the model
Code can be found here: https://github.com/DidierRLopes/fine-tune-llm/blob/main/scripts/02_train_model.py.
Model configuration
  base_model:
    path: "microsoft/Phi-3-mini-4k-instruct"

  lora:
    num_layers: 32
    lora_layers: 32
    rank: 16
    scale: 20.0
    dropout: 0.1
    keys:
      - "self_attn.q_proj"
      - "self_attn.k_proj"
      - "self_attn.v_proj"
      - "self_attn.o_proj"
Lora layers
From phi-3-mini-4k-instruct config file we know that it has 32 hidden layers (i.e. 32 transformer blocks comprised of multi-head self-attention, feed-forward network, and residual connections + layer norms).
In transformer models like Phi-3, different layers learn different levels of abstraction:
- Bottom layers (1-10) - "grammar": Learn fundamental language patterns - grammar, syntax, basic word associations. These layers understand that "CEO" is a noun, that it often precedes "of", and basic sentence structure.
- Middle layers (11-20) - "reasoning": Build conceptual understanding - connecting ideas, understanding context, domain knowledge. These layers learn that "OpenBB" relates to "finance" and "open source", that "Terminal" in my context means a financial analysis tool, not a computer interface.
- Top layers (21-32) - "style & expression": Handle vocabulary selection and style - choosing specific words, maintaining tone, formatting responses. These layers decide whether to say "leverage" vs "use", whether to include technical details, how to structure explanations.
Most fine-tuning tutorials suggest only adapting the top 8-16 layers because it's more memory-efficient and often sufficient for simple style transfer. But my writing isn't just about word choice - it's about how I conceptually approach topics:
- When I discuss technical topics, I ground them in practical examples (middle layers)
- I have specific patterns of explanation - starting broad, then diving deep (bottom-middle layers)
- My sentence construction tends toward clarity over complexity (bottom layers)
Also, I often change the order of the words due to Portuguese being my primary language - although not correct, ultimately I’m trying to fine-tune a model to represent my writing better. So, in this case, I adapted all 32 layers.
Although this happened when I was fine-tuning those 3.1M parameters 😭
Attention matrices
In LoRA, the matrices you can adapt are:
- Attention projections: Query, Key, Value, Output
- This is the most common and impactful, it changes which tokens pay attention to which and how strongly. Ultimately, this is where the reasoning comes from.
- Feed-forward (MLP) projections: W1, W2
- Changes how representations are transformed nonlinearly - not the most common
- Embeddings & LM head: token embedding matrix and output head
- Almost never adapted
We went with the attention projections to adapt the complete attention mechanism. Picking FFN matrices would make adapters 2-3x larger, and I didn’t think it was worth it.
Rank
LoRA works by adding to a big weight matrix of dimension d x d, and adapted weight matrix of dimension (d,d) - where d is the hidden_size and can be found in model config, in our case, 3072.
So wait, LoRA adds a matrix of size 3072 × 3072?
Yes and no.
It does, but in a smart way - and this is where rank comes into play.
LoRA adapts two matrices called A and B, where A is of dimension (d,r) and B is of dimension (r,d). The r value is the rank. And although multiplying these matrices results in a matrix of size (d,d), the number of parameters on A and B combined is 2dr.
So,
- Low rank (small r), LoRA can only make coarse adjustments (cheap, fast).
- High rank (large r), LoRA can make finer adjustments (better fidelity, but heavier).
I actually started with 8 on this one, but results weren’t the best so I doubled it.

Note: The AxB multiplication that happens which results in the new W matrix adapter is normalized by r. This makes it so the update’s magnitude stays roughly stable regardless of rank, otherwise r would linearly increase variance of the update.
Scale
What if you actually wanted there to be higher variance of the update?
As in, you wanted LoRA update to influence even more the frozen weight?
This is where the scale parameter α comes into play.
- Small scale α: LoRA update has a subtle effect.
- Large scale α: LoRA update dominates more strongly.
Most PyTorch examples use 1.0-5.0, but MLX's implementation benefits from higher scales - the community suggests 2 * rank as a rule of thumb, so that LoRA adapters weights don’t get drowned out by the base model frozen weights.
Dropout
Dropout p is cheap insurance against overfitting when your fine-tune dataset is narrow (e.g., aligning a model to one person’s writing style) or you have a small dataset (e.g. a few thousand samples). It works by randomly zeroing out parts of the low-rank update with probability p (0-1).
- Too much dropout: Slows learning (adapter doesn’t specialize enough).
- Too little dropout: Adapter memorizes quirks instead of general style.
If dataset is huge (not our case lol), often the dropout is skipped altogether since there isn’t the risk of overfitting (I mean it depends on the model a bit, but yea).
We went with 0.1, which falls under the recommendation.
Training Configuration
training:
  iters: 2000
  batch_size: 4
  learning_rate: 1e-5
  steps_per_eval: 50
  grad_checkpoint: true

optimizer:
  type: "adam"

metrics:
  patience: 5
  min_delta: 0.001

paths:
  train_data: "data/processed/train.json"
  test_data: "data/processed/test.json"
  logs_dir: "logs/training"
The training hyperparameters rationale:
-
Batch size 4: Larger batches (8-16) provide more stable gradients but require more memory and can miss fine details. Smaller batches (1-2) are noisy. 4 felt like a good sweet spot.
- With ~1,700 training samples and batch size 4, that means that there are 425 steps/epoch. An epoch corresponds to a full pass through the training dataset.
-
2000 iterations: With 425 steps per epoch and 2000 total steps, that means that there are roughly 5 epochs.
- This means that the model has seen each of the 1,700 examples ~5 times (in slightly different shuffles).
- If you kept training further (10–20 epochs), you risk overfitting, memorizing samples instead of generalizing.
-
Adam stands for Adaptive Momentum Estimation, it is one of the model widely used optimizers in deep learning, and an extension of stochastic gradient descent (SGD). This was an easy choice.
- Adaptive - each parameter gets its own learning rate (scaled by gradient history).
- Momentum - smooths updates, prevents oscillations.
- Automatic scaling - no need to tune learning rate schedules as much as vanilla SGD.
-
Learning rate 1e-5: This controls how big each update step is when adjusting parameters during training. Luckily, there are good rules of thumbs for this value in LoRA / LLM fine-tuning:
- Full fine-tunes (big models): 1e-5 to 1e-4
- LoRA fine-tunes (small adapters): 1e-5 is a very common sweet spot
- If unstable: drop to 5e-6 or even 1e-6
- If underfitting (loss barely moving): try 2e-5 or 3e-5
-
Evaluation every 50 steps: Frequent enough to catch overfitting early (40 checks across training), but not so frequent that it slows training.
- Each evaluation on 210 validation samples takes ~30 seconds.
-
Gradient checkpointing is a memory-saving technique that reduces GPU usage during training by only storing a subset of intermediate activations in the forward pass. When the backward pass runs, the missing activations are recomputed on the fly, which increases compute time but dramatically lowers memory requirements.
- Frees up memory so we can fit a batch size of 4 instead of 2, improving gradient stability.
- The ~20% slower training is a reasonable trade-off compared to the benefits.
-
Early stopping (patience 5 and min delta 0.001): If validation loss doesn't improve by 0.001 for 5 consecutive evaluations (250 iterations), training halts.
The training process
Training isn't just about pressing "run" and waiting. It's an active process of monitoring, adjusting, and sometimes killing runs that aren't working.
Let me walk you through what's actually happening when we fine-tune the model:
- Load base Phi-3 model (3.8B parameters)
- Freeze base model weights - these never change
- Add LoRA adapters (3.1M trainable params, ~0.08% of total)
- Train only the adapters using validation for monitoring
The magic here is that the training only updates the tiny LoRA matrices, but the combined output leverages the full 3.8B parameter knowledge base.
During each forward pass, the frozen base model produces its output, and the LoRA adapters add their learned adjustments on top - scaled by a factor of 20.0 to make the adaptations significant enough to matter.
In fact, every forward pass, the model processes 4 samples (batch_size), predicts the next tokens, and compares them to the actual tokens. The loss quantifies how wrong it was. Backpropagation then updates only the LoRA weights to reduce this loss.
During backpropagation, gradients flow only to the LoRA adapters - the base model parameters never receive gradients and never change.
Every 50 steps, I evaluate on validation data.
- Training loss dropping, validation loss dropping
- Learning - this is what you want! Model is learning from training data and generalizing to unseen validation data.
- Training loss dropping, validation loss flat
- Approaching capacity - model is learning from the training data, but it’s no longer generalizing better to unseen data. The model is "full" with the representational flexibility given. This is different from underfitting, where the model wouldn’t even be learning more from the training data.
- Training loss dropping, validation loss rising
- Overfitting - the model is “memorizing” training data examples. Time to stop, or early stoppage will take care of it.
- Both losses flat
- Learning rate too low or model saturated (and we need to go back to tweaking hyperparameters).
My training showed steady improvement until iteration ~1,500, where validation loss plateaued around 2.8. The training got halted here due to my patience-based early stoppage (patience 5 - i.e. 250 iterations, min delta 0.001). This saved me from overfitting and wasted compute on iterations 1,500-2,000 where no meaningful learning occurred.
Ultimately, this told me the model had extracted what it could from the data.
But what does a validation loss of 2.8 mean?
Validation loss of 2.8 translates to a perplexity of ~16.4. This means on average, the model thinks there are about 16 equally likely next tokens at each step.
For context, random guessing would be the vocabulary size (e.g. ~32,000) and a perfect model would have 1. So 16.4 is pretty good.
Note: The 3.1M parameters aren't learning language from scratch - they're learning how to nudge an already-capable model toward our specific use case. That's why LoRA is so sample-efficient and why we can achieve good results with relatively small datasets.
The base model retains all its general knowledge while the LoRA adapters inject domain-specific expertise. It's like having a general practitioner doctor (base model) who takes a specialized course (LoRA training) to better handle specific types of cases, without forgetting their general medical knowledge.
Training is fundamentally about finding the right balance: enough learning to improve performance, but not so much that you overfit to your training data. The validation curve is your compass, and early stopping is your safety net.
Training model logs
$ python scripts/02_train_model.py --model-config config/model_config.yaml --training-config config/training_config.yaml --train-data data/processed/train.json --val-data data/processed/val.json --test-data data/processed/test.json

============================================================
MODEL TRAINING PIPELINE
============================================================

Model config: config/model_config.yaml
Training config: config/training_config.yaml
Training data: data/processed/train.json
Validation data: data/processed/val.json
Test data: data/processed/test.json (for final evaluation only)

Metrics logging to: logs/training

============================================================
STARTING FINE-TUNING PIPELINE
============================================================

Loading training data from: data/processed/train.json
Loading validation data from: data/processed/val.json
Loaded 1705 training samples
Loaded 212 validation samples
Loading base model: microsoft/Phi-3-mini-4k-instruct

Fetching 13 files: 100%|██████████████████████████████████████████████████████████████████████████████████████| 13/13 [00:00<00:00, 46924.23it/s]

Model loaded successfully

LoRA config saved to: models/adapters/adapter_config.json
Freezing base model parameters...
Converting linear layers to LoRA layers...
LoRA setup completed:
Trainable parameters: 3,145,728 (0.08%)
Total parameters:     3,824,225,280
Setting up adam optimizer with learning rate: 1e-05

============================================================
TRAINING CONFIGURATION SUMMARY
============================================================

📊 Dataset:
Training samples:   1705
Validation samples: 212

🔧 LoRA Configuration:
Layers to adapt:  32/32
LoRA rank:        16
LoRA scale:       20.0
Dropout:          0.1
Target layers:    self_attn.q_proj, self_attn.k_proj, self_attn.v_proj, self_attn.o_proj

📈 Training Parameters:
Iterations:       2000
Batch size:       4
Learning rate:    1e-5
Eval frequency:   50
Grad checkpoint:  True

Starting training...
Training on 1705 samples
Validating on 212 samples
Starting training..., iters: 2000
Iter 1: Val loss 2.399, Val took 12.519s
Iteration 1: Val loss = 2.3986, Perplexity = 11.01
→ New best validation loss: 2.3986 (perplexity: 11.01)
Iter 10: Train loss 2.242, Learning Rate 1.000e-05, It/sec 0.805, Tokens/sec 484.578, Trained Tokens 6021, Peak mem 8.924 GB
Iteration 10: Train loss = 2.2423
Iter 20: Train loss 1.522, Learning Rate 1.000e-05, It/sec 0.815, Tokens/sec 487.475, Trained Tokens 12004, Peak mem 8.924 GB
Iteration 20: Train loss = 1.5223
Iter 30: Train loss 1.319, Learning Rate 1.000e-05, It/sec 0.580, Tokens/sec 464.444, Trained Tokens 20014, Peak mem 11.472 GB
Iteration 30: Train loss = 1.3188

(...)

============================================================
TRAINING SUMMARY
============================================================

📊 Training Completion:
Total iterations:     200
Early stopped:        True
Final train loss:     0.9613
Final val loss:       1.0499
Best val loss:        1.0393
Final perplexity:     2.86
Best perplexity:      2.83

⚠️  Training stopped early due to lack of improvement
 Patience counter reached: 24/5

📁 Output Files:
Adapters: models/adapters/
Training logs: logs/training/
Metrics plot: logs/training/training_metrics.webp
3. Evaluate the model
Code can be found here: https://github.com/DidierRLopes/fine-tune-llm/blob/main/scripts/03_evaluate_model.py.
The evaluation process answers a critical question:
Did the fine-tuning actually improve the model?
We compare two models:
- Base model: The original Phi-3-mini-4k-instruct (our baseline)
- Fine-tuned model: Base model + our trained LoRA adapters applied at runtime
Step 1: Loading models for comparison
For the base model evaluation, you need need to load the original model from HF.
model, tokenizer = load("microsoft/Phi-3-mini-4k-instruct")
For the fine-tuned model evaluation, you need to load the original model from HF AND apply the adapters at runtime.
model, tokenizer = load("microsoft/Phi-3-mini-4k-instruct") model.freeze()  # Freeze the base weights
linear_to_lora_layers(model, lora_config)  # Add LoRA layers
model.load_weights("adapters.safetensors")  # Load trained weights
We're not loading a completely different model file. We're taking the original model and applying the learned adapter weights on top of it at runtime.
Step 2: Test data generation
For each test question, both models generate responses.
E.g. "What is machine learning?"
base_response = generate(base_model, tokenizer, question, max_tokens=200)
finetuned_response = generate(finetuned_model, tokenizer, question, max_tokens=200)
Step 3: Measuring performance
We utilized world overlap as a simple and interpretable metric. It compares predicted words vs reference answer words. Uses Jaccard similarity: overlap = intersection/union.
Example:
- Reference: "Machine learning uses algorithms and data"
- Prediction: "ML uses algorithms to learn from data"
- Overlap: 4 words match out of 7 unique = 57%
A better eval (out-of-scope for this work) would be to implement a version of LMArena where I would ask a question, and get two answers (one from base model and one from fine-tuned) and then I would select which one looked more like my writing without knowing which is which.
Evaluate model logs
$ python scripts/03_evaluate_model.py --config config/evaluation_config.yaml --test-data data/processed/test.json --adapters-path models/adapters --base-model microsoft/Phi-3-mini-4k-instruct

============================================================
MODEL EVALUATION PIPELINE
============================================================
Standard evaluation: Base + Runtime LoRA Adapters

🔸 Step 1: Evaluating Base Model
============================================================
EVALUATING MODEL: base_model
============================================================
Loading model: microsoft/Phi-3-mini-4k-instruct
Fetching 13 files: 100%|██████████████████████████████████████████████████████████████████████████████████████| 13/13 [00:00<00:00, 16008.79it/s]
Model loaded successfully
Loading test data from: data/processed/test.json
Extracted 212 test questions
Generating predictions for 212 questions...
Generating predictions:   0%|

(...)

Generating predictions: 100%|██████████████████████████████████████████████████████████████████████████████████| 212/212 [15:24<00:00,  4.36s/it]
Calculating metrics for 212 samples...
Calculating word overlap scores...

============================================================
BASE_MODEL EVALUATION RESULTS
============================================================

📊 Word Overlap Metrics:
Mean:    0.1574
Median:  0.1586
Std:     0.0443
Range:   [0.0357, 0.2778]

📏 Length Statistics:
Predictions: 864.6 chars (±163.1)
References:  405.8 chars (±186.8)
============================================================
Metrics saved to: logs/evaluation/base_model_evaluation.json

Evaluation completed! Results saved to: logs/evaluation/base_model_evaluation.json

🔸 Step 2: Evaluating Base Model + Runtime LoRA Adapters
============================================================
EVALUATING MODEL: lora_runtime (Base + LoRA Adapters)
============================================================
Loading base model: microsoft/Phi-3-mini-4k-instruct
Fetching 13 files: 100%|███████████████████████████████████████████████████████████████████████████████████████| 13/13 [00:00<00:00, 3873.96it/s]
Loading adapter config: models/adapters/adapter_config.json
Freezing base model parameters...
Applying LoRA adapters...
Loading adapter weights: models/adapters/adapters.safetensors
✅ Model with LoRA adapters loaded successfully
Trainable parameters: 3,145,728 (0.08%)
Total parameters:     3,824,225,280
Loading test data from: data/processed/test.json
Extracted 212 test questions
Generating predictions for 212 questions...
Generating predictions:   0%|

(...)

Generating predictions: 100%|██████████████████████████████████████████████████████████████████████████████████| 212/212 [07:19<00:00,  2.07s/it]
Calculating metrics for 212 samples...
Calculating word overlap scores...

============================================================
LORA_RUNTIME EVALUATION RESULTS
============================================================

📊 Word Overlap Metrics:
Mean:    0.2008
Median:  0.2025
Std:     0.0591
Range:   [0.0449, 0.3913]

📏 Length Statistics:
Predictions: 381.9 chars (±72.9)
References:  405.8 chars (±186.8)
============================================================
Metrics saved to: logs/evaluation/lora_runtime_evaluation.json

Evaluation completed! Results saved to: logs/evaluation/lora_runtime_evaluation.json

🔸 Step 3: Model Comparison

============================================================
MODEL COMPARISON
============================================================

📊 Model Performance Comparison:
------------------------------------------------------------
Rank   Model                     Score           Metric
------------------------------------------------------------
1      lora_runtime              0.2008        Word Overlap
2      base_model                0.1574        Word Overlap
------------------------------------------------------------

🎯 Best Model (lora_runtime) vs Baseline (base_model):
Score Improvement: +27.6%
base_model: 0.1574
lora_runtime: 0.2008
============================================================
Score comparison plot saved to: logs/evaluation/word_overlap_comparison.webp
Score distribution plot saved to: logs/evaluation/word_overlap_distributions.webp
2025-08-18 01:11:15.187 python3[94401:196290991] The class 'NSSavePanel' overrides the method identifier.  This method is implemented by class 'NSWindow'

Comparison report saved to: logs/evaluation/model_comparison_report.json

📊 Detailed comparison plots saved to: logs/evaluation/model_comparison_report.json

============================================================
EVALUATION PIPELINE COMPLETED!
============================================================
📁 Output files:
Evaluation results: logs/evaluation/
Comparison plots: logs/evaluation/

🎉 Evaluation completed! Check the results in the logs directory.
Results and statistical analysis
The evaluation results tell a compelling story about the effectiveness of our LoRA fine-tuning approach.
Performance improvement
- Base model: 0.1574 word overlap (15.74%)
- FT model: 0.2008 word overlap (20.08%)
Improvement: +27.6% better performance
Consistency analysis
- Base model std dev: 0.0443 (relatively consistent but limited)
- FT std dev: 0.0591 (slightly more variable, but higher overall performance)
The increased standard deviation in the fine-tuned model actually tells a positive story. While the base model gives consistently mediocre responses, our fine-tuned model shows more range - it's capable of both the baseline performance and significantly better responses.
Range expansion
- Base model range: [0.0357, 0.2778]
- FT range: [0.0449, 0.3913]
The fine-tuned model's maximum score (0.3913) significantly exceeds the base model's best performance (0.2778). This 41% jump in peak performance shows the model learned to generate responses that better match the reference style and content.
Length analysis
- Reference Length: 405.8 characters (±186.8)
- Base model: 864.6 characters (±163.1) - verbose, unfocused
- FT model: 381.9 characters (±72.9) - concise, targeted
This is perhaps the most telling insight. The base model generates responses that are 2.2x longer than the references, suggesting verbose, unfocused answers.
The fine-tuned model produces responses much closer to the reference length (381.9 vs 405.8 characters), with lower variability (±72.9 vs ±163.1), indicating it learned the appropriate response style and length.
Parameter efficiency
- Total parameters: 3.82B
- Trainable parameters: 3.15M (0.08%)
- Performance gain: +27.6%
We achieved nearly 28% better performance by training just 0.08% of the model's parameters. This represents exceptional parameter efficiency - roughly 345% improvement per percentage point of parameters trained.
Statistical interpretation
What 20.08% Word Overlap Actually Means: In a 100-word response, our fine-tuned model shares about 20 words with the reference answer. While this might seem low, it's actually strong performance because:
- Multiple valid phrasing: "quick" vs "fast", "big" vs "large"
- Different valid approaches: Same facts, different explanations
- Context variations: References are specific examples, predictions are generalizations
The key insight is relative improvement. The base model achieved 15.74% overlap - our fine-tuning pushed this to 20.08%, crossing an important threshold where responses become noticeably more aligned with expected answers.
Vibe checking
Results and statistics are great, but there’s nothing like actually playing with the models and vibe check results. This is why I created interactive_chat.py file, so that we can ask a question - and we get responses from the base model but also fine-tuned model (and fused if it exists).
Prompt: "What is machine learning?"
Base model: "Machine learning is a subset of artificial intelligence (AI) that focuses on the development of computer programs and algorithms that can access data and use it to learn for themselves. In machine learning, algorithms use computational methods to identify patterns in data, learn from those patterns, and then make decisions or predictions based on the data they've studied.
There are three main types of machine learning: supervised learning, unsupervised learning, and reinforcement learning.
1. Supervised learning: In this approach, the algorithm is trained on a labeled dataset, meaning that the input data is paired with the desired output. The algorithm learns to map input data to output data based on this training. The goal is to create a model that can accurately predict the output for new, unseen data. Examples of supervised learning include classification (predicting a category or label) and regression (predicting a numerical value).
2. Unsupervised learning"
LoRA runtime (base + adapters): Machine learning is a subfield of artificial intelligence that focuses on the development of algorithms and statistical models to enable computers to learn and improve from data, without being explicitly programmed. It encompasses techniques such as supervised learning, unsupervised learning, and reinforcement learning, which enable systems to make predictions, detect patterns, and make decisions based on large amounts of data.
Fused model: Machine learning is a field of computer science that focuses on building algorithms capable of learning and improving from data, without explicit programming. It involves developing models that can make predictions or decisions based on input data, often through complex statistical techniques and mathematical optimization.
Interactive chat logs
$ python scripts/interactive_chat.py
============================================================
INTERACTIVE CHAT INTERFACE
============================================================
Mode: COMPARE
🔸 Loading base model...
Fetching 13 files: 100%|████████████████████████████████████████████████████████��███████████████████████████████████████████████████████████████████████████████████████████████████████████████████████████████████████████████████████████████████████████| 13/13 [00:00<00:00, 51198.08it/s]
✅ Base model loaded
🔸 Loading LoRA runtime (base + adapters)...
Fetching 13 files: 100%|███████████████████████████████████████████████████████████████████████████████████████████████████████████████████████████████████████████████████████████████████████████████████████████████████████████████████████████████████| 13/13 [00:00<00:00, 38130.04it/s]
✅ LoRA runtime loaded
🔸 Loading fused model...
✅ Fused model loaded
✅ Loaded 3 models: ['base', 'lora_runtime', 'fused']
============================================================
INTERACTIVE COMPARISON MODE
============================================================
Type your prompts to compare model responses.
Commands: 'quit' to exit, 'clear' to clear screen
------------------------------------------------------------
👤 You: What is machine learning
🤖 Generating from base...
🤖 Generating from lora_runtime...
🤖 Generating from fused...
Model on Hugging Face
Finally, using the script upload_model_to_hf.py, I have uploaded the model to my Hugging Face repo.
Uploading model to hugging face logs
$ python scripts/05_upload_model.py --repo-name didierlopes/phi-3-mini-4k-instruct-ft-on-my-blog
============================================================
MODEL UPLOAD PIPELINE
============================================================
Model path: models/adapters
Model type: LoRA Adapters
Repository: didierlopes/phi-3-mini-4k-instruct-ft-on-my-blog
Private: False
Dry run: False
Step 1: Validating model structure...
⚠️ Warning: Missing recommended files: ['config.json']
✅ Model validation passed
Found 21 model weight files
Total model size: 252.1 MB
Step 2: Initializing HuggingFace API...
✅ Authenticated as: didierlopes
Step 3: Creating repository...
✅ Repository ready: https://huggingface.co/didierlopes/phi-3-mini-4k-instruct-ft-on-my-blog
Step 4: Creating model card...
✅ Model card created: models/adapters/README.md
Step 5: Uploading model files...
Uploading 23 files...
Processing Files (21 / 21) : 100%|██████████████████████████████████████████████████████████████████████████████████████████████████████████████████████████████████████████████████████████████████████████████████████████████████████████████████| 264MB / 264MB, 441MB/s
New Data Upload : | | 0.00B / 0.00B, 0.00B/s
...apters/0000800_adapters.safetensors: 100%|██████████████████████████████████████████████████████████████████████████████████████████████████████████████████████████████████████████████████████████████████████████████████████████████████████████████████| 12.6MB / 12.6MB
...apters/0002000_adapters.safetensors: 100%|██████████████████████████████████████████████████████████████████████████████████████████████████████████████████████████████████████████████████████████████████████████████████████████████████████████████████| 12.6MB / 12.6MB
...apters/0000500_adapters.safetensors: 100%|██████████████████████████████████████████████████████████████████████████████████████████████████████████████████████████████████████████████████████████████████████████████████████████████████████████████████| 12.6MB / 12.6MB
...apters/0001900_adapters.safetensors: 100%|██████████████████████████████████████████████████████████████████████████████████████████████████████████████████████████████████████████████████████████████████████████████████████████████████████████████████| 12.6MB / 12.6MB
...apters/0001500_adapters.safetensors: 100%|██████████████████████████████████████████████████████████████████████████████████████████████████████████████████████████████████████████████████████████████████████████████████████████████████████████████████| 12.6MB / 12.6MB
...apters/0000600_adapters.safetensors: 100%|██████████████████████████████████████████████████████████████████████████████████████████████████████████████████████████████████████████████████████████████████████████████████████████████████████████████████| 12.6MB / 12.6MB
...apters/0000700_adapters.safetensors: 100%|██████████████████████████████████████████████████████████████████████████████████████████████████████████████████████████████████████████████████████████████████████████████████████████████████████████████████| 12.6MB / 12.6MB
...apters/0001000_adapters.safetensors: 100%|██████████████████████████████████████████████████████████████████████████████████████████████████████████████████████████████████████████████████████████████████████████████████████████████████████████████████| 12.6MB / 12.6MB
...apters/0001100_adapters.safetensors: 100%|██████████████████████████████████████████████████████████████████████████████████████████████████████████�████████████████████████████████████████████████████████████████████████████████████████████████████████| 12.6MB / 12.6MB
...apters/0000900_adapters.safetensors: 100%|██████████████████████████████████████████████████████████████████████████████████████████████████████████████████████████████████████████████████████████████████████████████████████████████████████████████████| 12.6MB / 12.6MB
No files have been modified since last commit. Skipping to prevent empty commit.
✅ Upload completed successfully!
Step 6: Verifying upload...
✅ Upload verified: 24 files in repository
============================================================
MODEL UPLOAD COMPLETED SUCCESSFULLY!
============================================================
🎉 Model uploaded to: https://huggingface.co/didierlopes/phi-3-mini-4k-instruct-ft-on-my-blog
Fused model
Code can be found here: https://github.com/DidierRLopes/fine-tune-llm/blob/main/scripts/04_fuse_and_evaluate.py.
While LoRA adapters are excellent for experimentation and sharing, production deployments often benefit from a single, unified model file. This is where fusion comes in.

Fusion mathematically merges your LoRA adapter weights back into the base model. It is recommended to use the fused model when:
- Deploying to production
- Inference speed is critical
- You want a single model file
- Sharing with users who aren't familiar with LoRA
It also uses less memory, since you have a single model instead of a model + its adapters.
However, keeping adapters may still be important, particularly when
- Experimenting with different configurations
- E.g. if you wanted to fine tune based on your blogs
- Storage/bandwidth is limited
- This is why I pushed the adapters to HF and not the fused model
- You need to swap between multiple fine-tuned versions
Note: Fusion is a one-way operation. Once fused, you can't extract the adapters back out. Always keep your original adapter files as your "source of truth". Think of the fused model as a compiled binary, and your adapters as the source code.
Fused model logs
$ python scripts/04_fuse_and_evaluate.py
============================================================
FUSION AND COMPREHENSIVE EVALUATION PIPELINE
============================================================
This script: 1) Fuses adapters 2) Evaluates Base + Runtime + Fused
Base model: microsoft/Phi-3-mini-4k-instruct
Adapters: models/adapters
Fused output: models/fused
Test data: data/processed/test.json
============================================================
STEP 1: ADAPTER FUSION
============================================================
✅ Fusion inputs validated successfully
============================================================
FUSING LORA ADAPTERS
============================================================
Base model: microsoft/Phi-3-mini-4k-instruct
Adapters: models/adapters
Output: models/fused
Command: mlx_lm.fuse --model microsoft/Phi-3-mini-4k-instruct --adapter-path models/adapters --save-path models/fused
------------------------------------------------------------
Loading pretrained model
Fetching 13 files: 100%|██████████████████████████████████████████████████████████████████████████████████████| 13/13 [00:00<00:00, 15029.20it/s]
------------------------------------------------------------
✅ Fusion completed successfully!
Fused model saved to: models/fused
============================================================
✅ Fusion completed: models/fused
============================================================
STEP 2: COMPREHENSIVE EVALUATION
============================================================
Evaluating: Base + Runtime LoRA + Fused
================================================================================
COMPREHENSIVE MODEL COMPARISON
Base Model vs Runtime LoRA vs Fused Model
================================================================================
🔸 Step 1: Evaluating Base Model
============================================================
EVALUATING MODEL: base_model
============================================================
Loading model: microsoft/Phi-3-mini-4k-instruct
Fetching 13 files: 100%|██████████████████████████████████████████████████████████████████████████████████████| 13/13 [00:00<00:00, 16881.10it/s]
Model loaded successfully
Loading test data from: data/processed/test.json
Extracted 212 test questions
Generating predictions for 212 questions...
Generating predictions: 0%|
(...)
Generating predictions: 100%|█�█████████████████████████████████████████████████████████████████████████████████| 212/212 [15:08<00:00, 4.29s/it]
Calculating metrics for 212 samples...
Calculating word overlap scores...
============================================================
BASE_MODEL EVALUATION RESULTS
============================================================
📊 Word Overlap Metrics:
Mean: 0.1563
Median: 0.1532
Std: 0.0468
Range: [0.0000, 0.3333]
📏 Length Statistics:
Predictions: 866.8 chars (±154.2)
References: 405.8 chars (±186.8)
============================================================
Metrics saved to: logs/evaluation/base_model_evaluation.json
Evaluation completed! Results saved to: logs/evaluation/base_model_evaluation.json
🔸 Step 2: Evaluating Base Model + Runtime LoRA Adapters
============================================================
EVALUATING MODEL: lora_runtime (Base + LoRA Adapters)
============================================================
Loading base model: microsoft/Phi-3-mini-4k-instruct
Fetching 13 files: 100%|██████████████████████████████████████████████████████████████████████████████████████| 13/13 [00:00<00:00, 13977.43it/s]
Loading adapter config: models/adapters/adapter_config.json
Freezing base model parameters...
Applying LoRA adapters...
Loading adapter weights: models/adapters/adapters.safetensors
✅ Model with LoRA adapters loaded successfully
Trainable parameters: 3,145,728 (0.08%)
Total parameters: 3,824,225,280
Loading test data from: data/processed/test.json
Extracted 212 test questions
Generating predictions for 212 questions...
Generating predictions: 0%|
(...)
Generating predictions: 100%|██████████████████████████████████████████████████████████████████████████████████| 212/212 [07:07<00:00, 2.02s/it]
Calculating metrics for 212 samples...
Calculating word overlap scores...
============================================================
LORA_RUNTIME EVALUATION RESULTS
============================================================
📊 Word Overlap Metrics:
Mean: 0.1940
Median: 0.1847
Std: 0.0627
Range: [0.0658, 0.3846]
📏 Length Statistics:
Predictions: 377.1 chars (±70.4)
References: 405.8 chars (±186.8)
============================================================
Metrics saved to: logs/evaluation/lora_runtime_evaluation.json
Evaluation completed! Results saved to: logs/evaluation/lora_runtime_evaluation.json
🔸 Step 3: Evaluating Fused Model
============================================================
EVALUATING MODEL: lora_fused
============================================================
Loading model: models/fused
Model loaded successfully
Loading test data from: data/processed/test.json
Extracted 212 test questions
Generating predictions for 212 questions...
Generating predictions: 0%|
(...)
Generating predictions: 100%|██████████████████████████████████████████████████████████████████████████████████| 212/212 [06:23<00:00, 1.81s/it]
Calculating metrics for 212 samples...
Calculating word overlap scores...
============================================================
LORA_FUSED EVALUATION RESULTS
============================================================
📊 Word Overlap Metrics:
Mean: 0.2027
Median: 0.2000
Std: 0.0638
Range: [0.0690, 0.4521]
📏 Length Statistics:
Predictions: 379.1 chars (±61.8)
References: 405.8 chars (±186.8)
============================================================
Metrics saved to: logs/evaluation/lora_fused_evaluation.json
Evaluation completed! Results saved to: logs/evaluation/lora_fused_evaluation.json
🔸 Step 4: Model Comparison
============================================================
MODEL COMPARISON
============================================================
📊 Model Performance Comparison:
------------------------------------------------------------
Rank Model Score Metric
------------------------------------------------------------
1 lora_fused 0.2027 Word Overlap
2 lora_runtime 0.1940 Word Overlap
3 base_model 0.1563 Word Overlap
------------------------------------------------------------
🎯 Best Model (lora_fused) vs Baseline (base_model):
Score Improvement: +29.7%
base_model: 0.1563
lora_fused: 0.2027
============================================================
🔸 Step 5: Fusion Verification
============================================================
FUSION QUALITY VERIFICATION
============================================================
📊 Word Overlap Comparison:
Runtime Adapters: 0.1940
Fused Model: 0.2027
Absolute Diff: 0.0086
Relative Diff: 4.45%
⚠️ Acceptable fusion quality - some degradation detected
📈 Additional Metrics Comparison:
Word Overlap Std Dev: Runtime 0.0627 | Fused 0.0638
Word Overlap Range: Runtime [0.066, 0.385] | Fused [0.069, 0.452]
============================================================
📁 Comprehensive results saved to: logs/evaluation/comprehensive_comparison_20250818_021105.json
============================================================
PIPELINE COMPLETED SUCCESSFULLY!
============================================================
📊 Models Evaluated: base_model, lora_runtime, lora_fused
🎯 Key Results:
base_model: 0.1563 (Word Overlap)
lora_runtime: 0.1940 (Word Overlap)
lora_fused: 0.2027 (Word Overlap)
📁 Detailed results saved to: logs/evaluation/
📁 Fused model available at: models/fused
Wrap up
And that’s it!
The results demonstrate that LoRA fine-tuning achieved its goal: meaningful performance improvement with minimal computational overhead, faster inference, and more focused responses that better match the target domain.
I hope you find this helpful, all the code can be found here: https://github.com/DidierRLopes/fine-tune-llm.